Come Visit Me At My New Home!

Nutrition.Health.Life has moved to a WordPress domain. Visit me at my new location: nutritionhealthlife.wordpress.com
Showing posts with label Vegetarian. Show all posts

Friday, October 30, 2009

Another Lasagna Idea!

A few weeks ago I posted on the super easy lasagna recipe I made in the slow cooker. That recipe was a little meaty for me, so I wanted to try a little variation. I added vegetables and cut back on the cheese a little too (this recipe yields more, so while the cheese looks about the same in the recipe, it is spread out over more servings). The results – perfect! Jason said it was just as good as the other one…and there were no strings attached on his answer, I promise! The icing on the cake for this recipe is that you do not have to get one pan dirty in the process…that’s right, no stove needed!

Ingredients
  • ½ bag frozen spinach, thawed
  • Roasted Red Peppers, 2 large halves, diced
  • 1 small onion, diced
  • 2/3 cups frozen peas, thawed
  • 8-10 whole wheat lasagna noodles, broken to fit the crock pot
  • 1 jar spaghetti
  • 1 cup of water
  • Garlic, per your preference
  • ¾-1 cup shredded part-skim mozzarella cheese
  • Parmesan cheese
Directions
  1. Mix the spaghetti sauce, water, and garlic together in a bowl. Scoop 1 cup of sauce mixture into the 4 qt crock pot. Top with a layer of noodles. 
  2. Top the noodles with sauce, vegetables, and cheese. Add more noodles and repeat with sauce, vegetables, and Parmesan cheese until it is as high as you'd like (reserve the rest of the mozzarella cheese for the top). Be sure to end with sauce and cheese on top. 
  3. Cook on low 4-5 hours*.
*I (accidently) left it for about 6 hours and the top cheese was starting to brown. Be sure to take it out before that happens!

Friday, August 21, 2009

Potato Bake


This recipe received a 10/10 from Jason. I don't know if I have ever made something he liked so much before...ever. He usually hates scale ratings. I always asked him to rate things on a scale of 1 to 10 and it usually ends with him changing the subject so I forget he never rated what I asked. This time, however, he said "10" instantly. This recipe is super easy and delicious. It is too heavy for me for summer, so I plan to make it again once things cool down here in IL in a few months.

Ingredients
- 4 baked potatoes, cooked and NOT peeled
- 3 TBSP butter
- 1/4 cup skim milk
- salt
- pepper
- 1 c. frozen peas, thawed
- 1/2 large zucchini, thinly sliced
- 1 onion, diced
- 1/2 cup whole wheat bread crumbs
- 6 oz. marble cheddar cheese, shredded

Directions
1. Preheat oven to 350F. Spray a 9" baking dish with nonstick spray.
2. In a large bowl, mash the potatoes. Add the butter and milk and whisk with an egg beater on high until highly whipped. Stir in the vegetables and seasonings.
3. Pour mixture into the sprayed dish. Smooth out with a rubber spatula. Top with bread crumbs and cheese.
4. Bake for 20 minutes or until cheese is melted and the edges are starting to brown.

Friday, August 7, 2009

Potato-Greens Torta

This is Torta I made months ago and just got around to blogging about. Jason and I are very cheap and often shop at Aldi. One week a 10 pound bag of potatoes were on sale for $0.70. No, I didn't put the decimal in the wrong spot - 70 cents for 10 pounds of potatoes! We couldn't pass that deal up, so when I got home I got to cooking. I made over a gallon of potato soup (I will try to find the recipe and blog about it soon), some Pot Pie with potato added, and this recipe. I had never cooked lettuce before (the whole idea seemed odd but then I guess it is similar to cooking spinach), but I trusted that Cooking Light knew what they were talking about when they put together this recipe and I went for it. It turned out to be very good...even better with fresh Parmesan cheese on top :)

Potato and Green Totrta
Slightly modified from Cooking Light Magazine

Ingredients:
- 1 1/2 pound potatoes, washed and cubed, but not peeled
- 3 1/2 tsp salt
- 1 TBSP canola oil
- 3 cloves of garlic
- 4 cups torn romaine
- 3 cups frozen spinach, thawed and drained
- 1 cup green onion, diced
- 1/2 cup skim milk
- 1/2 cup Parmesan cheese
- 2 large eggs
- 3 TBSP bread crumbs
- cooking spray

Directions:
1. Preheat oven to 375F and coat a 9" square pan with cooking spray.
2. Cook potatoes over the stove using a steamer. Mash into a bowl.
3. Heat oil in a large skillet. Add garlic and onion. Cook for 2 minutes. Add greens and cook until wilted.
4. Add cooked greens, milk, cheese, eggs, and salt to potatoes. Stir well. Press mixture into the greased pan and top with bread crumbs.
5. Bake at 375F for 25 minutes. Remove from the oven and let cool for 10 minutes before slicing and serving.
Ingredients

Sunday, August 2, 2009

Snacks


Plums and Mangoes

Bing Cherries

Veggie Packs

Monday, July 27, 2009

For two years I have been trying to find a recipe for veggie burgers that doesn't fall apart. I had tried tofu, beans, sprouts, you name it, and every time the burger would crumble to pieces in the frying pan. The moment I put these burgers together I knew they would not only hold up to the frying pan, but would hold up to the grill. Hayley at Buff Chickpea knew what she was talking about when she said this was the only veggie burger a cook would need. While I didn't follow the recipe to a T, it is basically the same recipe.

Beans are so cheap - at less than $1 a bag, these burgers cost pennies to make.

These were so good that not only did Jason have two for lunch (working out is making him eat like he is back in college doing two-a-days for football) but asked about making more for his lunches in the coming weeks. When I made the recipe I made enough for 10 veggie burgers. These could be cooked first and then frozen for an easy reheat or frozen first, thawed out and then cooked for a fresh burger. It is really up to what you'd like to do - save time now and cook them later or cook them now and save time later. I made them at 8pm on a Sunday night before having to get up at 4:15 to the run the next morning, so I opted for the later.

Ingredients
- 1 pound bag of chickpeas soaked, boiled, and drained (make sure they are cooled completely before using if you do this all in the same day)
- 1 pound bag of great northern beans, soaked, boiled, and drained
- 1 jar roasted red peppers, drained
- 1 bunch of green onions
- 1 TBSP diced garlic
- 1 TBSP chopped fresh basil
- 4 large eggs
- 1 1/2 cup ground flax seed
- 3/4 cup ground whole wheat bread crumbs
- salt and pepper as desired
*I am terrible at following recipes, so I recommend using your judgement with these. I believe I recall how much of each item I used, but I could be wrong. If the burgers are too wet, at more grains. If they are too dry, add some olive oil or an extra egg.

Directions
1. Place half the beans in a blender for food processor. Add half of the red peppers, onions, garlic, and basil. Add 2 eggs and blend on medium until a semi-smooth consistency.
2. Remove from blender and set into a big bowl. Add half the flax seed and bread crumbs. Mix well and let sit.
3. Repeat with the remaining ingredients.
4. Once blended, add to the bowl and add the remaining flax seeds and bread crumbs. Mix well and let stand for 5 minutes.
5. Spray wax paper with cooking spray. Form burgers with your hands and place onto the wax paper. Repeat until all of the mixture is used up.
6. If freezing, set in the freezer like this and let harden over night. In the morning, remove from wax paper and place in a freezer bag. When you decide to cook them, let them thaw out first to prevent from over cooking the outside.
7. If cooking immediately, heat oil in a skillet or heat a grill. If grilling, spray the grill grate with cooking spray for grilling to prevent sticking (we forgot to do this and lost some on the grate). Cook for about 5 minutes on each side, or until the center is 165F (this has eggs in it, so make sure it is cooked all the way).

They may be a little dry if you freeze them and then cook them, but I just added some Olive Oil Mayo and a slice of Sharp Cheddar made with 2% milk. Eat them with a delicious homemade hamburger bun and you'll wonder why you didn't think of this sooner.

Friday, March 27, 2009

An Attempt at Japanese Pizza

I think it may be my stubborn nature, but I can never seem to follow a recipe's directions. Let me clarify - while I am very capable of following the directions, I never seem to want to. I think that bread is the only recipe I will follow to a T. Sadly, this lack of discipline often leads to my recipe not coming out as planned. This is a perfect example. I bought what I thought was small head of cabbage for making 101 Cookbook's Japanese Pizza. I cut the cabbage in half and chopped it up, thinking it would be the perfect amount - it was WAY too much. I don't know what possesses me to do this, but I figured I would improvise. It is usually at this point when I just start doing my own thing with still expecting the recipe to turn out. This recipe, however, is one where I needed to flip the mixture over and after looking at it in the pan, I knew there was no way that was going to happen. So instead I decided to mash it up and make a kind of cabbage slop. Luckily Jason will try anything, so I asked him to try and let me know what he thought. Surprisingly, he loved it. He said it reminded him of a hearty pie filling - SUCCESS! However, since it was a success, I definitely did not learn my lesson in following directions.

Okonomiyaki Crumble
Adapted from 101 Cookbook's Okonomiyaki (Japenese Pizza)

Ingredients
  • 3 cups of chopped cabbage
  • 1 cup of onions
  • 1 cup of frozen peas, not thawed
  • 1 cup of frozen corn, not thawed
  • 1 cup of all purpose flour
  • 3 eggs beaten
  • salt 
  • pepper
  • olive oil
Directions
  1. Combine the cabbage, leeks, peas, corn, and flour in a bowl and mix well.
  2. Whisk eggs in a separate bowl and then add to the mixture. Mix until everything is coated.
  3. Heat a large skillet over medium heat. Add at least 1 tbsp olive oil, but more if you'd like. Pour in mixture and push down. Let cook at least 5 minutes. If you can flip it, go ahead and flip it. If not, crumble it up like scrambled eggs and mix it around so everything cooks. It will take about 10 minutes total. 
  4. Serve with salt and pepper.'
**I plan to try making this into a pie. I would preheat an oven to 375F. Make a standard pie crust and fill with this mixture. Bake for maybe 35 minutes, or until the filling is set and browned. If the crust is browning but the middle isn't done, cover the crust with foil. I don't know for sure about the temp and times, but that is what I would guess. Let me know if you try this!

Friday, March 20, 2009

Cheese Enchilada Casserole

Jason and I love tacos and enchiladas. While the real Mexican food from an authentic restaurant is obviously as good as it gets, we rarely eat out, so our home-made variety usually suffices. This recipe turned out delicious and was very easy to make. It could be prepared ahead of time, so when you get home you just need to pop it in the oven.

Cheese Enchilada Casserole
Recipe from EatingWell.Com
Serves 4-6

Ingredients

  • 1 cup (4 ounces) shredded reduced-fat extra-sharp cheddar cheese
  • 1 cup salsa
  • 1 cup fat-free sour cream
  • 1/3 cup sliced onions
  • 2 teaspoons chili powder
  • 1 garlic clove, minced
  • 9 (6-inch) corn tortillas
  • Cooking spray
  • 1 cup taco sauce (such as Ortega)
  • 1/4 cup shredded Mozzarella

Directions

  1. Preheat oven to 375°.
  2. Combine first 6 ingredients in a medium bowl. Arrange 3 tortillas in bottom of an 11 x 7-inch baking dish coated with cooking spray. Spread half of cheese mixture over tortillas. Repeat procedure with 3 tortillas and remaining cheese mixture; top with remaining tortillas.
  3. Pour taco sauce over tortillas; sprinkle with Monetary Jack cheese. Bake at 375° for 20 minutes or until cheese melts. 

Thursday, March 19, 2009

Beans, Beans, the Magical Fruit...

the more you eat the more you..." We all know the song from childhood. I was recently told that this is actually a myth. The more you eat, the easier it is for your body to digest, so the less you ... :)

Jason and I were unsure what to make for dinner the other night. The refrigerator was full of leftovers, all of which we had eaten at least once and while they were tasty, we were in the mood for something different. We settled on Mexican, but were stuck again. Jason also has meat tacos, so when I suggested refried black bean burritos, he was a little hesitant. I told him not to worry, which I often have to do when I am cooking something new. A good friend of mine had called, so I handed the spatula and a few simple instructions over to Jason for cooking the dinner. Needless to say, he was successful. We enjoyed our burritos that night and there was even some for another meal. This made me think about how versatile this mixture really is. With that in mind, I am posting the recipe along with a few meal ideas. 

Refried Bean Mixture
Ingredients
  • 2 tsp olive oil
  • 1 can refried black beans
  • 1 cup diced green peppers
  • 1 cup diced red peppers
  • 1 cup diced onions
  • 1/2 pint of cherry tomatoes, halved (1 cup)
Directions
  1. Heat the oil in a large skillet over medium-high heat. Cook the onions and peppers until tender. Add the black beans and cook for one more minute. Turn off the heat and add the cherry tomatoes.

Meal Possibilities
  1. Place 1/2 cup of mixture on the center of a tortilla. Top with a dollop of sour cream and some shredded marble cheddar cheese.
  2. Place 1/2 cup of cooked brown rice on a plate, top with the black bean mixture and shredded cheese.
  3. Preheat the oven to 350F. Spray a baking dish with cooking spray. Place 1/4 cup of mixture in a tortilla and roll up. Place the rolled tortilla in the pan and repeat until the pan is full. Cover with green taco sauce and/or salsa. Top with cheese. Bake for 30 minutes.
  4. Preheat oven to 375F. Roll out (or prepare a homemade) pizza crust. Cover the pizza crust with a thin layer of the refried bean mixture. Top with extra onions, peppers, and tomatoes. Cover the pizza with marble cheddar cheese. Cook for 12-15 minutes or until the crust is crispy and the cheese is melted. 
If you have any ideas for meals with refried beans, please leave a comment!

Wednesday, March 18, 2009

Cucmber Relish Pasta Salad

This pasta salad was intended to just be a relish on top of the salmon, but I couldn't think of another side; we had been eating too much rice lately, so good old rice just wouldn't do. Instead, I decided to take the relish and turn it into a pasta salad. This salad is packed with nutrients. Yes, there is some oil in it, but fat is good for you - as long as it is the right kind. Olive oil and Canola oil contain monounsaturated fatty acids, which are super heart healthy. Something I didn't know until my Advanced Nutrition and Metabolism class was that a lot of the phytochemical in vegetables are fat-soluble, which means they need some added fat to help with absorption. 

Take home message: Using some healthy fats in your meal will assist in absorbing more of the beneficial phytochemicals, help you feel full (satiety), and make your meal taste great. 

Cucumber Relish Pasta Salad
Serves 6-8

Ingredients
  • 1 large cucumber, seeded and chopped
  • 1/2 large red bell pepper, diced
  • 1/4 white onion, diced
  • 1 large stalk of celery
  • 2 cups of whole wheat penne pasta, cooked
  • 1 tbsp oil 
  • 2 tsp balsamic vinegar
  • 1 tbsp water
  • 1 tsp garlic powder
  • 1 tsp dried oregano
  • 1/2 tsp pepper
  • 1 tsp chili powder
  • 1/2 tsp paprika
Directions
  1. Combined the vegetables and pasta into a large bowl.
  2. Combine the ingredients from the oil down in a small bowl and whisk well. Add more oil if needed.
  3. Pour marinade on the pasta-vegetable mixture and mix well. Use a spatula to make sure you get all of the marinade out of the bowl and well distributed. 
  4. Refrigerate for at least 1 hour before serving.

Friday, March 13, 2009

Veggie Pot Pie

Growing up, chicken pot pies from the freezer were my favorite treat. Imagine my surprise in early college when I learned that some people actually make their own pot pies from scratch! It was an amazing revelation and since then I try to make them every few months. While the one's from the freezer have biscuit all around, mine usually just have a biscuit topping. I try to limit the breads in meals like this since it seems we always eat too much bread. Also, too much biscuit fills me up so I can't enjoy all the delicious filling. This is a vegetable  pot pie, but you could add any meat you want. I have clarified in the directions when you should add the meat.

Veggie Pot Pie
Adapted from the "Turkey Pot Pie" recipe at EatingWell.com
Serves 6

Filling Ingredients

  • 1 tbsp canola oil, divided
  • 1 cup onions, diced
  • 1 cup diced carrots
  • 1 cup frozen corn
  • 2 1/2 cups reduced-sodium vegetable broth, divided
  • 1/4 cup cornstarch
  • 1 cup frozen peas, thawed
  • 1/4 teaspoon salt, or to taste
  • Freshly ground pepper to taste
Biscuit Topping Ingredients
  • 3/4 cup whole-wheat pastry flour
  • 3/4 cup all-purpose flour
  • 2 teaspoons sugar
  • 1 1/4 teaspoons baking powder
  • 1/2 teaspoon baking soda
  • 1/2 teaspoon salt
  • 1 teaspoon dried thyme
  • 1 1/2 tablespoons cold butter, cut into small pieces
  • 1 cup buttermilk or equivalent buttermilk powder
  • 1 tablespoon canola oil
Directions

  1. To prepare filling: Heat 1 teaspoon oil in a large skillet over medium-high heat and add onions and carrots; cook, stirring, until golden brown and tender, about 7 minutes. 

  2. Add 2 cups broth and bring to a boil; reduce heat to a simmer. Mix cornstarch with the remaining 1/2 cup broth; add to the pan and cook, stirring, until the sauce thickens. Stir in and meat (if using), peas, corn, salt and pepper. Transfer the filling to a 2-quart baking dish.

  3. To prepare biscuit topping & bake potpie: Preheat oven to 400° F. 

  4. Whisk whole-wheat flour, all-purpose flour, sugar, baking powder, baking soda, salt and thyme in a large bowl. Using your fingertips or 2 knives, cut butter into the dry ingredients until crumbly. Add buttermilk and oil; stir until just combined. 

  5. Drop the dough onto the filling in 5 or 6 even portions. Set the baking dish on a baking sheet.

  6. Bake the potpie until the topping is golden and the filling is bubbling, 30 to 35 minutes. Let cool for 10 minutes; serve.

Tuesday, December 16, 2008

Homemade Pizza

Once you have homemade pizza crust, other pizzas just don't taste the same. I made my first homemade pizza crust 2 years ago and I can only remember buying pizza once since then! I got the crust recipe from The Big Book of Vegetarian. It is great because it makes four crust that can be frozen for later use, so you don't need to make a new crust every time.

Here is a brief lesson in baking with yeast. Yeast eats sugar to ferment, so never omit sugar, no matter how "health conscious" you are trying to be. Also, sugar substitute will not work. Salt kills yeast; a little is good because it keeps the yeast "in-check" and prevents over proofs. However, too much will kill the yeast completely. The water temperature is VITAL for the yeast. If it is too cold, the yeast won't ferment. If it over 115F, the yeast will die. I suggest temping the water every time you are making something with yeast.

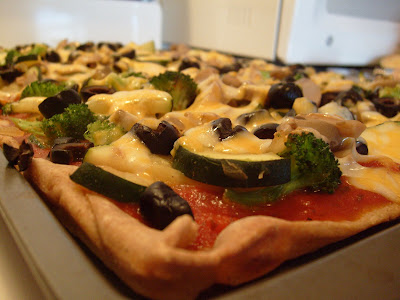
Pizza is one of those foods that everyone seems to think is forbidden, when in actuality, it can be quite healthy. This crust is half white, half wheat and the pizza is loaded with veggies and topped with a little cheese. While it is not like the triple cheese and meat pizza from your local chain pizza joint, it taste 100% better and is 100% guilt free :) My guess is that each slice has 1/2 - 1 serving of veggies, so eat up!

Wheat Crust (from The Big Book of Vegetarian)
[My notes are in italics]

Ingredients
-1 1/4 cups of warm water (105-115F)
-1 envelope or 1 scant tbsp of active dry yeast
-1 tsp sugar
-3 cups all purpose flour
-2 cups whole wheat flour
-2 large eggs
-2 tsp salt

* The original recipes is 3 cups of all-purpose flour and 2 cups of whole wheat flour; however, I have made it with 3 cups of whole wheat and 2 cups of all-purpose flour and it is has turned out. The only downfall is when you freeze the latter dough and thaw it at a later date, it doesn't roll out as well.

Directions
  1. In a small bowl, mix the water, yeast and sugar; let stand for 10 minutes, or until foamy. I usually heat the water in a glass measuring cup and then just add these items to the measuring cup to save dishes.
  2. In a food processor, combine the all-purpose and whole wheat flours, eggs, and salt. Pulse to mix. With the motor running, pour in the yeast mixture through the feed tube in a steady stream. Process until the dough cleans the sides of the bowl and then process for 45 seconds longer (this takes the place of the kneading), or until the dough is smooth and elastic. I do not have a food processor big enough for this, so I do it in the old fashion way. I mix the flours and salt together in a large bowl, add the egg and mix well. I then add the yeast mixture and stir together. once 3/4 of the flour is incorporated with the yeast mixture, I take it out of the bowl and and work in the remaining flour. I then knead for 5-8 minutes, or until the dough is smooth and elastic.
  3. Put the dough in a large, oiled bowl and turn to coat. Cover the bowl with plastic wrap and let rise in a warm, draft-free location for about 1 hour or until doubles in volume. I usually place this in the oven (obviously when it is off). I have had the yeast double in as little as 45 minutes.
  4. Punch down the dough and divide into 4 equal parts. shape the pieces into balls, lightly cover with dough with a kitchen towel and let rest for 30 minutes (the dough will NOT double in volume). Again, I usually stick this in the oven.
  5. Roll each dough out. If you plan to save the dough for later, roll it out large enough to fit into a freezer bag (but don't put it in yet). Wrap the dough in plastic wrap and then put into a freezer bag. You can freeze the dough for up to 3 months or you can refrigerate the dough for up to 2 days.

If you plan to make the dough now, continue reading below...

Pizza Recipe

Ingredients
-1 thin crust pizza dough (see above)
-Olive oil
-Pizza sauce of spaghetti sauce
-Toppings of your choice
-Cheese of your choice, grated*

*If you are looking for a health option, choose low-fat, part-skim mozzarella cheese. White cheeses are lower in fat than orange cheeses.

Directions

  1. Preheat the oven to 400F.
  2. Spray or coat a baking pan with olive oil. Roll out the dough to fit in the pan and place into the pan. Fold the edges over to form a small crust, if desired. Lightly coat the crust with olive oil.
  3. Bake the crust for 5 minutes on a lower-middle rack to crisp it up slightly.
  4. In a skillet, saute any vegetables you are using for the pizza in olive oil. Season as desired.
  5. When the crust is done, remove from the oven and lightly coat with pizza sauce. Pour some on the crust and spread with a spoon to evenly distribute. Top with vegetables (and any other topping you are using), followed by cheese.
  6. Bake the pizza for 5-7 minutes on the lower-middle rack. Let cool and cut into 12 pieces.

Thursday, November 20, 2008

Vegetable Soup

Soup is another crock pot favorite. It is one of the easiest things to make, so I rarely ever buy canned soup.


Ingredients
It is really whatever you want and can fit in your crock pot! Here is what I used:
-1 24-oz can of diced tomatoes
-1 15oz can of black bean
-1 15oz can of white beans
-1 yellow onion, diced
-3 large carrots, chopped
-1 large zucchini
-1 cup of frozen green beans, unthawed
-4 tsp vegetable bouillon cub powder
-1 cup of water (plus more if you think it needs it)


Directions
Place all of the ingredients, except the last two, in a 5-6 serving crock pot. Mix the bouillon cube powder with the water until the clumps are gone. Pour over the ingredients in the crock pot. Cook on low for 5-8 hours.

Saturday, November 1, 2008

Back with a delicious recipe :)


Boy, oh Boy has this semester been busy! I literally do not have time to even think about taking pictures of the food I make because I need to inhale it in 10 minutes before I have to go somewhere else! I did have time last Friday (when I should have been studying for an exam but needed a break) to make some pumpkin bread. It is absolutely DELICIOUS! I love the idea of squash or pumpkin in baked goods because it lets you go light on the fat and still have a delicious and moist product. It is also high in vitamin A and provides some fiber. If you are wondering what to do with your pumpkin, I strongly suggest you try this recipe...you will not be disappointed :)

As for posting for the next few weeks...they will be few and far between, but I will try to keep up with it!

Wheat Pumpkin Bread

Ingredients
◦ 1 ½ cups all purpose flour
◦ 2 cups whole wheat flour
◦ 1 tbsp baking powder
◦ 2 tsp baking soda
◦ 1 tsp salt
◦ 1 tsp ground nutmeg
◦ 1 tsp ground cinnamon
◦ ½ tsp ground allspice
◦ 1 ½ cups granulated sugar
◦ 2 egg whites or ½ cup egg substitute
◦ ½ cup canola oil
◦ ½ cup low-fat buttermilk (if you don't have buttermilk, use sour milk or 1/2 cup skim milk + 1 tsp cream of tarter)
◦ 2 large eggs
◦ 2/3 cup water
◦ 1 can pumpkin
◦ 1/3 cup chopped pecans

Directions
  1. Preheat oven to 350F
  2. Combine flours and all of the dry ingredients except the sugar into a medium bowl.
  3. Place the sugar, egg whites or egg substitute, oil, buttermilk and eggs in to a large bowl and beat with a mixed on high until well blended.
  4. Add 2/3 cup of water and pumpkin, beating on low speed until blended.
  5. Add flour to the mixture, beating on low speed just until combined.
  6. Spoon batter into 2 9x5" loaf pans coated with cooking spray.
  7. Sprinkle with pecans and bake at 350F for 1 hour, or until wooden pick inserted comes out clean.
  8. Cool 10 minutes n pans on a wire rack; remove from pan and cool completely on wire rack.

Sunday, September 14, 2008

A Lunch Time Favorite

When I think there is nothing in the house to eat, there are ALWAYS two things: Bread and Cheese. What is more comforting than a good old grilled cheese sandwich? Not much! Jason and I love grilled cheese sandwiches and usually end eating them at least once every other week. We use a non-stick pan, so only a little butter goes a long way. I also make them on the George Foreman Grill for a lighter option. However, they taste 100% different, so if you are in the mood for that crispy, buttery crust, stick to the pan.


Grilled Cheese Ingredients:
(for one half of the grilled cheese below...I usually only have one, but Jason was hungry and is having two in the pictures)
  • 2 slices of Home-made bread
  • 5-6 slices of cheese from the skinny end of the cheese (if you have a brick, put it flat on a cutting board and cut 5 slices from the left side)
  • 1 tbsp of softened butter (or less if you are using a non-stick pan. By using softened butter, a little will go a long way)

Directions

  1. Heat a small skillet to medium heat (about level 6)
  2. Butter one side of each slice bread.
  3. Place the butter side down in the pan and put the pieces of cheese side by side from the left skinny side of the bread to the right. Place the second slice of bread on top, buttered side up.
  4. Let sit about 3 minutes.
  5. With a spatula, flip the sandwich over. A little trick...flip from the skinny side, not the wide side. I always flipped from the wide side and it would fall apart. Since Jason has showed me the skinny side flip, they turn out perfect every time!
  6. Cook about 3 more minutes.
  7. Repeat for 1 minutes on each side, if the sides need more browning.

Ingredients for the Zucchini Side Salad

  • 1/2 tbsp olive oil
  • 1 large zucchini, coined (see picture)
  • 2 beef-steak tomatoes, cut into wedges and then cut in half
  • 1-2 tsp garlic powder
  • 1-2 tsp Italian Seasoning
  • Parmesan cheese

Directions

  1. Heat a large skillet to medium-high with the oil in the skillet.
  2. Place the zucchini slices in the pan. Let sit about 1 minute and then turn frequently so both sides brown.
  3. After about 5 minutes, add the tomatoes and seasonings.
  4. Cook until the zucchini are soft and browned.
  5. Serve topped with Parmesan cheese.

Happy Lunch :)

Saturday, September 13, 2008

Dinner for a Rainy Saturday

Jason is back home in WI for the at a good friend's bachelor party, so I am alone for the entire weekend. At first I was so excited about how much school work I would get done. However, the rain has made me want to do everything but school work...laundry, cleaning (including the bathrooms), and, of course, cook.
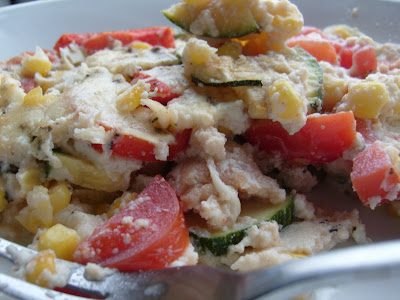
This morning I found a new food blog called Straight from the Farm. Just from the few recipes I looked at this morning, I can tell I will like this one! One recipe was for a corn and tomato bread pudding. I saved this one instantly, because I had some tomatoes sitting the refrigerator getting older by the minute. I also had some zucchini in there with them (are you surprised?), so I figured I could throw those in as well. Instead of fresh corn I used some frozen corn. I don't ever have half and half on hand, but I did have some ricotta left from the Eggplant Ziti I made last week, so I figured I could mix it with skim milk to mimic some half and half (or I would at least try). I admit I was a little nervous to try it when it was done, but I was pleasantly surprised that all my substituting and experimenting worked out well! I am excited to have Jason try it tomorrow.


Corn, Tomato, and Zucchini Cheese Tart

Ingredients

1 large zucchini, quartered and diced

4 Roma tomatoes, halved and diced

1 ½ cup frozen (or fresh) corn, thawed

2 slices of whole wheat bread

1 cup of Ricotta cheese

1/3 cup skim milk

1-2 tbsp Parmesan cheese

¼ cup Mozzarella cheese, shredded

2 eggs

1 ½ tsp dried thyme

1 tsp dried savory

½ tsp salt

½ tsp pepper

1 tsp dried basil

Directions

  1. Preheat the oven to 350F
  2. In a large bowl, add vegetables and stir well.
  3. In a medium bowl, whisk the eggs. Once lightly foamed, add ricotta cheese and whisk until evenly distributed. Add skim milk and whisk until evenly distributed. Add seasonings Parmesan cheese.
  4. Spray a 9” square baking dish or similar size dish. Rip up the bread and place on the bottom. Rip enough bread to coat the bottom of the pan (extra if you’d like).
  5. Pour the vegetable mixture over the bread.
  6. Sprinkle the mozzarella cheese over the vegetables.
  7. Pour the egg mixture over the top, completely coating.
  8. Bake uncovered for 40 minutes. It is done when an inserted knife comes out clean.

Friday, September 5, 2008

A Veggie Twist on Ziti

Personally, I am not a fan of eggplant. I try, I really do, but I can't seem to enjoy anything I have ever made with it. I usually end up substituting zucchini for it in dishes like this. However, I figured I would give it my annual late summer try. Overall, the dish turned out pretty good and the eggplant was palatable (The dish would be great without it). If you like eggplant and Italian food, you will enjoy this recipe!

Baked Ziti with Eggplant

Ingredients
1 - 28oz can of whole tomatoes, drained
1 cup fat fee ricotta cheese
¼ cup red onion, chopped
1 tbsp fresh parsley
1 tbsp fresh thyme
½ tsp salt
¼ tsp crushed red pepper
2 small eggplants, cubed
4 cups cooked penne or ziti pasta
3 slices of mozzarella cheese
Grated Parmesan cheese
Spaghetti Sauce 

Directions

  1. Heat oven to 400F and spray an 11x7x1.5” baking pan
  2. Break up tomatoes in a large bowl. Stir in ricotta cheese, onion, and seasonings.
  3. Fold in pasta and eggplant
  4. Spread pasta mixture and layer cheese on top.
  5. Bake for 25 minutes* 
  6. Top with grated Parmesan cheese and spaghetti sauce 

*The eggplant turned out a little tough after 25 minutes. If you like your eggplant softer you have two options:

1.      Cook (I would sauté for flavor) the eggplant prior to adding to the casserole.

2.      Cover the dish and bake for 30 minutes. Remove the foil and bake until the cheese is lightly browned. 

Sunday, August 31, 2008

Yet another zucchini recipe

Zucchini is still everywhere, so I have been trying to save a little money by making dishes with it every week. This week I tried a modified version of a recipe from cookinglight.com (link to original below)

This dish is nothing short of delicious. As it was cooking, Jason mentioned it smelled like pizza. I truly think you feed this to an "anti-zucchini" person and turn them into a fan.

Not only is it delicious, it is not very high calorie at all. The cheese serves at the main protein source and contributes most of the calories. The red pepper aioli is a little more calorically dense. I do not like to use fat free mayo; I don't think the taste is the same and there are so many added ingredients, that I would prefer to just eat the real thing. To lighted the aioli, I was thinking I could probably use some fat free plain yogurt for ½ the mayo. I thought I could substitute fat free sour cream (which doesn't bother me because there are not as many added ingredients as mayo) for the mayo as well. If anyone tries these variations, please let me know how they are!


Zucchini Casserole with Red-Pepper Aioli
(Modified from a recipe at cookinglight.com:(http://find.myrecipes.com/recipes/recipefinder.dyn?action=printerFriendly&recipe_id=665216)


Ingredients
◦ 3 cups sliced onion
◦ 6 slices Wheat bread, toasted
◦ 28 ounces, caned, no-salt-added diced tomatoes, drained
◦ 1 tbsp fresh basil
◦ 1 tbsp fresh oregano
◦ 1/2 teaspoon dried thyme
◦ 1/4 teaspoon black pepper
◦ 1 tbsp garlic powder
◦ Cooking spray
◦ 4 medium zucchinis halved lengthwise and thinly sliced
◦ 2 cups (8 ounces) shredded part-skim mozzarella cheese
◦ ½ cup Parmesan cheese
◦ Red-Pepper Aioli (see recipe below)

Directions

  1. Preheat oven to 375°. Grease a 3 quart casserole dish.

  2. Cut 2 bread slices into 1-inch cubes; set aside.
    In a medium bowl, place tomatoes. Stir in basil, thyme, oregano, pepper, and garlic.

  3. Place 1/2 cup onion in the bottom of a 3-quart casserole dish coated with cooking spray.

  4. Arrange 2 bread slices, half of the remaining onion, half of the tomato mixture, half of the zucchini, and half of the cheese over onion in dish. Repeat layer; top with bread cubes.

  5. Cover and bake at 375° for 30 minutes. Uncover casserole and bake an additional 25 minutes or until top begins to brown.

  6. Spoon Red-Pepper Aioli over the top. Enjoy!


Red-Pepper Aioli

Ingredients

  1. 1 tbsp garlic powder
  2. 1/2 cup fat-free mayonnaise
  3. 1/2 teaspoon salt
  4. 1/4 teaspoon crushed red pepper
  5. 7 ounces of bottled roasted red bell peppers, drained

Preparation

Add ingredients to a food processor. Process all ingredients until well-combined.

Wednesday, August 20, 2008

Homemade "Hummus"

While I am not sure what specific ingredients specifically make hummus, hummus, I personally think it is the chickpeas. With that, I am calling this concoction hummus, even though there is no lemon juice or Tahini. Jason and and I really like hummus for sandwiches and dipping bread and vegetables in. I had planned to make a sun-dried tomato and basil pasta one week, but it didn't work out, so I decided to use the ingredients for this dip.

When we first started making our own hummus our recipe usually just included 1 can of drained chickpeas, and Zesty salad dressing (sun-dried tomato, Italian, etc...). This recipe isn't much different.

Ingredients:
-1 can of chickpeas, drained, or dry chickpeas, soaked and cooked.
-Ready-to-use Sun Dried Tomatoes
-Fresh Basil
-Sun-dried Tomato Dressing
-Sunflower Seeds

Directions:
  1. In a food processor, add the chickpeas, a handful of sun-dried Tomatoes, about 1 tbsp fresh-packed basil, a splash of salad dressing, and about 1/4 cup of sunflower seeds.
  2. Process on high until smooth - you may need to scrape down the edges and stir a little so it is all blended.
  3. Taste to see the flavor at this point. If it is runny, add more chickpeas or sunflower seeds. If it is dry, add more salad dressing. If it is bland, add more basil and sun-dried tomatoes.
  4. Blend with added ingredients and repeat process until the final product is as you like it.

Friday, August 15, 2008

Green Bean and Tomato Salad

This is one of my favorite side salads. It is full of flavor, but only takes about 15 minutes to make. I guarantee you will enjoy it!

Jason always told me he hated Balsamic Vinaigrette. We would be having a salad with dinner and when I asked what kind of dressing he would like he always would say, "anything we have except balsamic." I decided I would play a little trick on him when I made this salad and not mention what the dressing was. Instead, I just asked him to taste it since it was for the next nights dinner. His response..."that is so good!" My response..."I told you that balsamic vinaigrette isn't that bad." Needless to say he easily ate half of the salad over the next few days :)

Delicious Green Bean and Tomato Salad
Ingredients
1 pint of grape tomatoes (you could also use cherry tomatoes, I just prefer grape)
1 pound roma tomatoes
1 pound fresh green beans
Feta Cheese
Balsamic vinaigrette salad dressing

Directions
  1. Halve the grape tomatoes and place in a large bowl.
  2. Cut the ends off the green beans and then cut the green beans into halves, thirds, or quarters, depending on the size. Add to the large bowl.
  3. Cut the Roma tomatoes in half lengthwise. Holding the tomato together, rotate it on the cutting board and cut it in half lengthwise again. Still holding the tomato together, slice it into 1/4" thick pieces. Add to the large bowl.
  4. Add about 1/4 cup of dressing to the bowl and stir well. Add more if needed.
  5. Add about 1/4 - 1/3 of the crumbled feta cheese package to the bowl and stir until evenly distributed. Again, add more if desired.
  6. Refrigerate for at least 1 hour or up to 5 (possibly more, but ours didn't last that long) days.

Wednesday, August 13, 2008

Zucchini Boats

With Zucchini being in season, I have been finding TONS of recipes for ways to use them up. This recipe was one I found at Rachel Ray's website: http://www.rachaelraymag.com/recipes/salad-vegetable-recipes/cheesy-zucchini-boats/article.html. While I didn't do more than read the recipe once, now that I look at it again, I realize it is almost the same! If you need ideas for weekly meals, you can sign up to get e-mail with a menu planner and shopping list from her website (http://www.rachelraymag.com/). While I haven't used these yet, I do get some good ideas for some dinners during the week.

Zucchini Boats

Ingredients
- 3 medium size zucchinis
- 1 small vidalia onion
-10 grape tomatoes, sliced
- Olive oil (1-2 tbsp)
- 1 large garlic clove, minced
- Mrs. Dash Table Blend
- 1/8 cup freshly grated Parmesan cheese
- 1/4-1/2 cup shredded, part-skim mozzarella cheese

Directions

Slice the zucchinis in half lengthwise. Place them in a microwave-safe dish and microwave on high for 3 minutes, until the centers are slightly softened.

With a knife, cut into the zucchini, leaving about 1 cm of the "boat" skin. I made a guide line down the middle and at an angle on each side. With a spoon, gently scrape the flesh out and set aside (do not discard).


Blot the water out of the zucchini shells and place them on a greased pan.

Chop the zucchini flesh into smaller, 1/2" pieces. A rough chop will do.

In a skillet, heat 1/2 tbsp of oil. Add the zucchini and cook down. Transfer the zucchini to a strainer and push out as much liquid as possible.

In a larger skillet, heat 1/2-1 tbsp oil. Add onion, zucchini, garlic, and any other desired seasonings (I used Mrs. Dash Table Blend). Cook until onions are tender. Turn off heat and add the sliced tomatoes. Set aside.

Turn the broiler on. Add the grated Parmesan cheese to the filling mixture and stir well. Add the mixture to the zucchini boat shells. Top with shredded cheese.

Broil for 5 minutes, or until the cheese is lightly browned. Serve warm with garlic toast and marinara sauce (if desired...I thought it was tasty!)